QA testing is an important part of software development. Therefore, it is important to have the most effective and powerful automation tool available on the market. The best choice is an automation tool that allows you to not only create automated tests but also fully automate the whole QA testing process. In this case, the automation tool becomes the QA tester’s assistant; it can perform almost any QA testing actions, such as run scheduled automated tests, checking results, sending reports to different issue-tracking systems and a lot more.
Functional testing consists of testing the interface between the application on one side and the rest of the system and users on the other side. This article describes TestComplete’s support for functional testing. It explains how to create a project, create functional tests and automate the QA testing process. At the end of article, there is an example of automated functional testing.
TestComplete supports testing desktop, web and mobile applications. In this article, we will explain the principles of functional testing. We will work with a desktop application, however, you can use the same approach to test your web and mobile applications.
Functional Testing — Concepts
Functional testing is a form of automated testing that deals with how applications functions, or, in other words, its relation to the users and especially to the rest of the system. Traditionally, functional testing is implemented by a team of testers, independent of the developers.
While unit testing tests both what an application segment does and how it does it, functional testing tests only what the application does. A functional test is not concerned with an application’s internal details.
Another way of stating this is that functional testing is "the customer test". But even this is misleading. Developers need a benchmark during all development stages — a developer-independent benchmark — to tell them what they have and have not achieved. Functional testing begins as soon as there is a function to test and continues through the application’s completion and first customer contact.
The expression, "the customer test", can be misleading in another way. Some people think of functional testing as mimicking a user and checking for an expected output. But the real customer is not just someone feeding commands into the application. They are running the application on a system, simultaneously with other applications, with constant fluctuations in user load. The application, of course, should be crash-resistant in the face of these conditions.
More and more, the user interface of our applications is supplied by pre-tested components, which produce few surprises once they are integrated correctly. On the other hand, we are constantly asked to write custom applications for systems of ever-increasing complexity. Therefore, the central functions tested by a functional test are increasingly system-related rather than user-related.
Functional Testing — Features
Automation tools, like, TestComplete, support functional testing of the gui by automating its repetitive aspects and producing results in a flexible, filtered form. In addition, TestComplete enhances its functional testing feature by providing the following opportunities:
- Continuity. Even the simplest functional test should be applicable throughout the life of a project, and it should be capable of automatically measuring results against an already-validated standard output. TestComplete’s Test Log is designed to meet these criteria.
- Application-grade tests. Functional testing should be kept external to the application as much as possible. TestComplete provides features that can be made required, so that this criterion is met:
- Visually constructed keyword tests and scripts using any programming constructions in your tests: loops, if-then conditions, try-catch blocks, comments and so on.
- A sophisticated library of functional testing objects with easy and transparent methods and properties that perform any functional testing actions over applications as well as simulate user actions.
- More objects that directly interact with the system or with database servers (ADO, BDE).
- Advanced properties and methods for functional testing of .NET, Java and web applications.
- Special properties and methods for careful functional testing of applications with third-party controls: Windows Forms, Developer Express, Infragistics, Syncfusion, MFC, Qt, Telerik, and others.
- White-box testing. TestComplete provides un-matched access to internal properties and methods of the applications for a more in-depth level of functional testing.
- Orientation. Developers must be sure that the functional tests check the exact code that worries them. This brings up a potential problem. On one hand, functional testing should be application independent; on the other hand it should check internal objects of the application. TestComplete can get access to the application’s internal details which solve this potential problem. The application can be tested externally, but monitored internally — both before designing the functional test, by viewing it in the Object Browser, and during the functional test, by adding code (external code) to see if the expected internal area is being exercised.
Keyword Tests — Keyword-Driven Testing
A keyword test is a visually designed table of keywords, where each keyword means a particular functional testing action (a keystroke, a mouse click and so forth). Each functional testing action is represented by a keyword test operation, or operation, for short. Thereby, creating functional tests means dragging the appropriate operations to the test and specifying their parameters. A keyword test is the easiest to understand and the simplest functional test to implement. We will use keyword tests to implement functional tests in this article. However, you can implement any kind of QA testing methodology in the same way. As you become familiar with TestComplete, you will be able to use scripting routines for implementing functional tests. Writing automated test scripts requires more experience than creating keyword tests.
Keyword tests consist of operations that perform various actions like simulating user actions on tested objects, performing various verification actions, calling methods or properties of the tested objects and more. Keyword tests are created and edited visually with special editors, wizards and dialogs. They can also be recorded. All of these features make keyword tests a simple but powerful alternative to writing script code. By using them, even inexperienced users can quickly and easily create the desired testing functionality and automate your tests.
Further in the article we will create functional tests using keyword tests, not automated test scripts, because it is a lot easier than writing script routines. However, you can use automated test scripts to do the same actions as those described in the article. You can also start creating functional tests by using keyword testing technology and then add more tests, including scripting routines, to your project.
Determining Functional Testing Purposes
Which application do we test? Which functionality do we check? These are the main questions we should answer first of all. Because we are going to demonstrate how to create and then automate functional tests, let’s take a simple application and check its functionality. The tested application that we will work with in this article is Notepad.

Picture 1. The Notepad Tested Application
First, we should determine which functionality we will check in Notepad. Then we will implement functional tests, launching and stopping Notepad automatically from TestComplete. Let’s write our plan of attack for this functional test:
Functional Testing Plan
- Testing purpose
- TestComplete project creation
- Test construction
- Test automation
- Test execution
- Checking results
Let’s determine our testing purpose, for instance, like checking the text input within Notepad. So, we will only have one functional test, checking the text input. However, you can add something else to your functional test later to experiment.
According to our plan, now we need to create a TestComplete project. Note that Notepad is a desktop application, so we will use TestComplete with the Desktop module.
Creating the TestComplete Project
You can follow along with this article with TestComplete
TestComplete works with automated tests organized into projects. For instance, it is useful to have a particular project for each tested application. Each project consists of project items that perform automatic testing operations or assist in performing these operations.
To create a project, you can do the following:
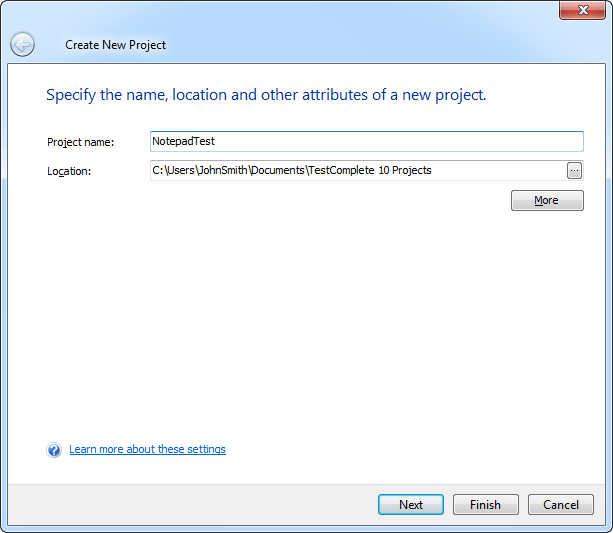
Picture 2. Creating New Project
- Launch TestComplete. Click the Create a New Project item in the Start Page. After the Create New Project wizard appears, type the name of the future project, in our case, it will be "NotepadTest". Then specify the project location in the computer.
- After the settings are ready, you can click the Finish button.
After you click the Finish button, a new project suite will be generated and the NotepadTest project will be added to it. We will use the following project items:
- TestedApps – here we will add the tested applications
- KeywordTests – here we will add all required tests
Now that the NotepadTest project is created, we can add the tested application to it. To add Notepad as the tested application, do the following:
- Right-click the TestedApps project item and select Add| New Item from the context menu.
- Find the application’s executable. For instance, Notepad’s executable is NOTEPAD.EXE.

Picture 3. Browsing the Notepad Executable
- After you have found the needed *.exe, click Open. Then the application will be added to the project and you can double-click the TestedApps project item to see the list of tested applications. In our case, it will look like the following:
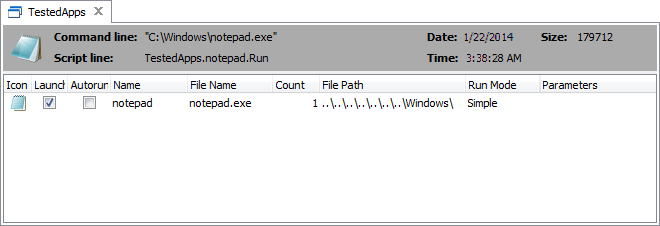
Picture 4. The Project’s Tested Applications
Note that the path to NOTEPAD.EXE may be incorrect if you have saved the downloaded project, for instance, to the C:\ Users\Public\Public Documents\TestComplete 10 Samples\ folder. If the downloaded project is located in another folder, adjust the File Path parameter to the correct NOTEPAD.EXE path.
- Save changes made to the project.
After we have specified Notepad as the tested application, we can start to automate our functional test with it, such as starting, minimizing, stopping the application and other functional testing actions.
Now we have the following project structure:
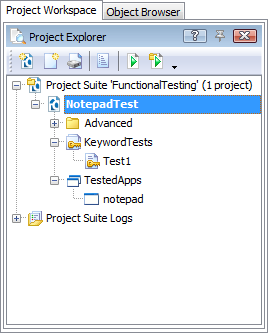
Picture 5. The NotepadTest Project Structure
The KeywordTests project item contains the application’s functional tests. We will describe how to create these tests in the following section. The NameMapping project item contains a collection of name mapping settings, that is, it defines which custom name corresponds to which object. This project item is automatically created when you are recording automated tests with TestComplete. You can also add this item to the project manually before recording automated tests.
When running automated tests, TestComplete generates a test log and adds it to the FunctionalTesting Logs item.
Creating Functional Tests
According to our plan, we need to create a functional test for checking the text input feature within Notepad. The easiest way to get started doing this is to record all functional testing actions as a keyword test.
To record a keyword test, you can perform the following actions:
- Run Notepad.
- Click Record Keyword Test from the TestComplete’s toolbar:

Picture 6. Recording From TestComplete
- After that the Recording toolbar will appear. With the toolbar, we can pause, stop recording, create checkpoints to control the application, and a lot more:

Picture 7. The Recording Toolbar
- Now TestComplete records any user actions made to the application. According to the first functional test concept, we will check the text input within Notepad. To do this, perform the following actions:

Picture 10. Create Property Checkpoint Dialog
- Select the wText property from the dialog and click Next:

Picture 11. Selecting a Property for Checking
- Type the expected value in the ensuing dialog. In our case, the value must be equal to the typed text in the document: "Jack Brown works at the factory.":

Picture 12. Specifying Comparison Parameters
- Click Finish to add the checkpoint to the recorded test.
- Return to Notepad. Press CTRL+A to select all text from the document and then press DEL to delete it.
- Stop recording the functional test by clicking the
 Stop button from the Recording toolbar. You've now finished recording your functional testing actions.
The recorded functional test will look like the following:

Picture 13. The Recorded Test
If the typed text does not match the value that was recorded, the Property Checkpoint operation will post an error message to the test log. To improve your functional test, you can also add the following operations manually:
- Log Message operations for posting messages to the test log
- Comment operations that provide advanced information about particular keyword operations
- Delay operations that pause the functional test playback
You can also give a meaningful name to the functional test, for instance, "CheckingTextInput". To do this, rename the appropriate test in the Project Explorer panel.
Automating Functional Tests
Now we should automate the functional testing process. We need to create two more functional tests to run and stop Notepad. Then we will specify all three functional tests as the test items for the project. In this case, TestComplete will sequentially execute these tests when we run the project.
Running the Tested Application
We will automate the tested application from a functional test created with TestComplete’s keyword testing feature. To do this, you can perform the following actions:
- Add a new keyword test to the project, for instance, name it "RunningApp".
- Add the Run TestedApp operation to the test and select NOTEPAD from the tested applications’ list:

Picture 14. Run TestedApp Operation’s Parameters
- Click Finish.
The RunningApp test is ready, save the changes to the project:

Picture 15. The RunningApp Test
Stopping the Tested Application
You can also stop the tested application from a functional test:
- Add a new keyword test to the project, for instance, name it "StoppingApp".
- Launch Notepad. After that add the Process Action operation and select Notepad from the list of processes and click Finish:

Picture 16. Selecting Process for Process Action
- Then select the Close method which terminates the specified process:

Picture 17. Selecting a Method for Process Action
- Click Finish.
Congratulations! Now all of your functional tests are implemented. We can also group our functional tests into folders, so the project will have the following structure:
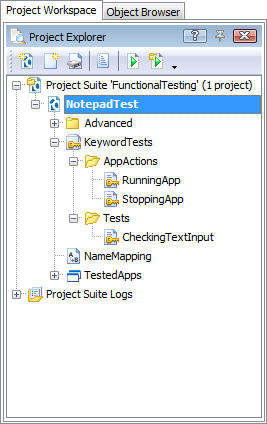
Picture 18. The NotepadTest Project’s Structure
The final step when preparing for testing is specifying the sequence of functional tests to be executed in the project.
Configure the Project
Now we should configure our TestComplete project for automated testing with our functional tests. To do this, you can open the Test Items page of project properties:
- Right-click the NotepadTest project in the Project Explorer.
- Select Edit | Test Items from the context menu.
The Test Items page helps organize the project, especially if we have a lot of functional tests, projects and other project items. Once the desired sequence of functional tests is specified, we can run all of them by clicking one button.
We should specify the three functional tests that we created in our project in the following order:
- RunningApp
- CheckingTextInput
- ClosingApp
To add a test item to the list, you can perform the following actions:
- Select New Test Item from the toolbar.
- Click the ellipses button in the appeared row.
- Select the appropriate functional test and then click OK to confirm.
The test items in our project will look like the following:

Picture 19. The Project’s Test Items
We have now created a complete project for automating the functional testing of Notepad. Now we can start functional testing and obtain our results.
Running Functional Tests
After we have created all required functional tests and automated them, we can execute our functional testing and get our results. You can run the automated tests in several ways, for instance, you can right-click the Notepad project in the Project Explorer and then select Run Notepad [Project] from the context menu.
After finishing tests, TestComplete saves the results to the Test Log:
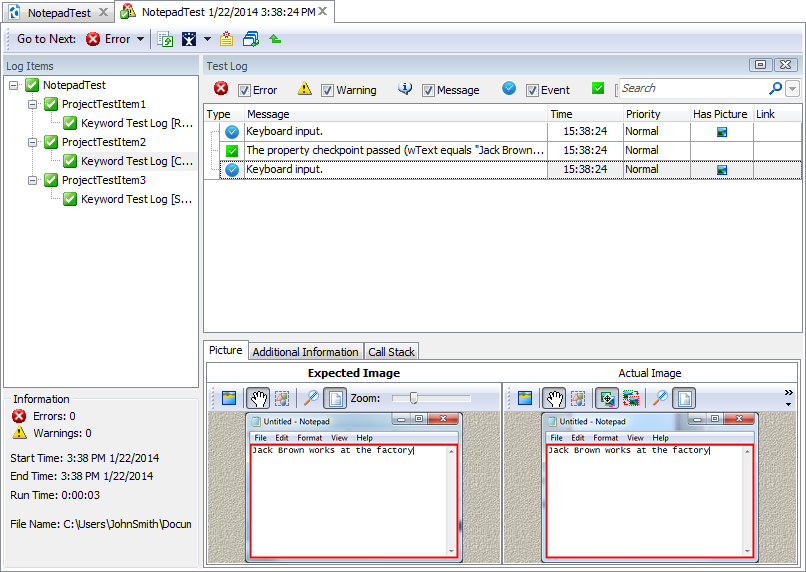
Picture 20. The Project’s Test Log
You can print, export the results in different formats, send the results by e-mail and even send the log directly to bug tracking software.
Conclusion
With TestComplete and its keyword testing feature, Functional testing just became easier. By using TestComplete’s keyword tests, even inexperienced QA testing members can quickly perform powerful functional testing. Keyword tests help you reduce the time and energy (and therefore expenses) needed for creating functional tests.
If you enjoy functional testing with TestComplete, TestLeft can be a great addition to your testing environment. TestLeft allows you to create functional tests in any IDE, generate application models for webpage or desktop applications in just two clicks, and allos you to accelerate your shift left movement with BDD.
TestLeft can be a great addition to your testing environment.