How to Setup and Get Started with Calabash
Calabash is a quite popular choice for the test automation framework and works fairly well with both Android and iOS. One of the greatest things with Calabash is that tests work seamlessly on both platforms if your application is identical. As this is not always the case, you might need to break down test scripts for both platforms. In this blog, I’ll walk you through of very basic setup, installations and how to get started with Calabash.
Get This Calabash 101 to Help You Setup Calabash Properly.

Calabash Prerequisites and Calabash Installation
Calabash requires Ruby to be installed on your machine. First, check whether you have Ruby installed on your machine:
$ ruby -v
We typically recommend the latest and greatest, but some older ones (e.g. 1.8.7 or 1.9.1) should work fine too. However, the latest versions are proven to work without any friction (especially with iOS) so if possible please upgrade to the latest one. We also recommend the use of Bundler to ensure you get all dependencies properly installed:
$ gem install bundler
$ bundle install
In addition, if you plan to manage several versions of Ruby, it’s recommended to use tools like rbenv.
If you are not using Mac or Linux, you can also install Ruby from RubyInstaller.org for Windows.
ANDROID
If you want to use Calabash for Android, make sure you have the latest and greatest SDK installed. Depending on which desktop you use it’s also always recommended to create an environmental variable ANDROID_HOME to point the location of unzipped or installed SDK folder.
$ gem install calabash-android
and you should have command calabash-android in your path.
iOS
For the host machine, it’s recommended to have (at least) Mac OS 10.10 (Yosemite) or 10.11 (El Capitan) with Xcode 6.x or 7.x. More information about Xcode 7.x installation can be found at Apple’s developer site.
To get Calabash for iOS installed, use the following command line:
$ gem install calabash-cucumber
After this, you have commands calabash-ios and cucumber in your path and 11 gems will be installed (including tilt, rack, rack-protection, sinatra, sim_launcher, command_runner_ng, CFPropertyList, run_loop, geocoder, edn, and calabash-cucumber).
If you are using Mac OS X, you could also use cURL to fetch all files to your machine:
$ curl -sSL https://raw.githubusercontent.com/calabash/install/master/install-osx.sh | bash
This will install both calabash-android and calabash-ios, and if everything goes smoothly, you should see something as follows on your console:
Preparing Ruby 2.1.6-p336...
######################################################################## 100.0%
Installing gems, this may take a little while...
######################################################################## 100.0%
Preparing sandbox...
######################################################################## 100.0%
Done! Installed:
calabash-ios:       0.18.2
calabash-android:   0.6.0
Execute 'calabash-sandbox update' to check for gem updates.
Execute 'calabash-sandbox' to get started!
Troubleshooting
If you are installing Calabash for the first time, you should restart the terminal after installation, as not all done during installation might not be in use. Simply restarting the bash session will do the trick. After restarting the console, you can quickly verify this by calling calabash-android or calabash-ios to see if anything gets printed on the console.
Now, depending again on which desktop OS you use you might need to install specific versions of Ruby. In the case with Ruby on Ubuntu or Mac, please check this troubleshooting documentation.
The Basic Calabash Setup
After you have verified that the environment is properly configured, we can move to generate a basic file structure for your first Calabash test.
Create a temp directory for both Calabash Android and iOS tests:
$ mkdir calabash-test-android
$ cd calabash-test-android
$ calabash-android gen
...
$ cd ..
$ mkdir calabash-test-ios
$ cd calabash-test-ios
$ calabash-ios gen
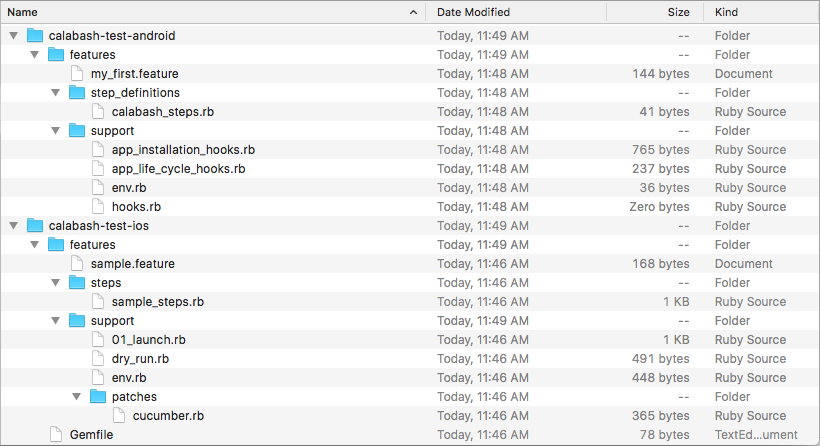
You’ll be asked a few questions, plus to press enter, and as a result, the following folder structure should have been created:

Now let’s look at those files what is automatically generated for your first test foundation.
Examples
Calabash for Android generates you my_first.feature file that is an example of a Calabash feature:
Feature: Login feature
  Scenario: As a valid user I can log into my app
    When I press "Login"
    Then I see "Welcome to coolest app ever"
The feature describes a basic behavior (scenario) or several of them readable and easy to understand language. These ‘scenarios’ can be grouped together logically under the Feature definition. As in this example, Feature definitions are typically given a name and optional short description of the behavior.
The generated Android test bundle of files also contains an empty file for Step Definitions in calabash_steps.rb.
The iOS example includes more details on Steps. These steps usually begin with one of the keywords: Given, When, Then, And, and But, however, they don’t have to, they can use * in place of those keywords. Cucumber language does not distinguish between these keywords or *. Instead, they are meant to provide a language hint based on what will happen.
The sample.features found in the root of calabash-test-ioscontaining the basic example of Calabash Features and Scenario use:
Feature: Sample Feature
Scenario: Sample Scenario
  Given the app has launched
  And I have done a specific thing
  When I do something
  Then something should happen
These keywords are defined in sample_steps.rb. For example, Given looks as follows:
Given(/^the app has launched$/) do
  wait_for do
    !query("*").empty?
  end
end
And then And which includes a basic dummy example of what could go inside the given keyword. These Step definitions are somewhat like the code behind these scenarios. These functions are the ones that translate all readable and human-friendly test into runnable actions.
And(/^I have done a specific thing$/) do
  # Example: Given I am logged in
  #  wait_for do
  #    !query("* marked:'username'").empty?
  #  end
  #
  #  touch("* marked:'username'")
  #  wait_for_keyboard
  #  keyboard_enter_text("cleveruser27")
  #
  #  touch("* marked:'password'")
  #  wait_for_keyboard
  #  keyboard_enter_text("pa$$w0rd")
  #
  #  wait_for_element_exists("* marked:'Login'")
  #  touch("* marked:'Login'")
  did_something = true
  unless did_something
    fail 'Expected to have done something'
  end
end
This example includes some steps of how the test would be progressed and what would happen in terms of test execution and progress. Naturally, these step definitions can be configured and build to be very specific for your application and test.
We’ll be deep-diving into Features, Step definitions, Scenarios and generally how to build your first Calabash tests for both platforms in our next blog. Stay tuned!