How to Get Started with Calabash (iOS example)
Besides Appium, Calabash is the other great test automation framework for cross-platform app testing. It provides a great cross-platform test automation framework for Android and iOS native and hybrid apps. Calabash provides an easy-to-understand language syntax – so it is a great fit for non-technical folks as well.
Download FREE Calabash 101 to Start Your Calabash iOS Tests.
Installation & Prerequisites
First of all, you need to have Ruby installed. This is installed by default on Mac OS X.
Verify by running ruby -v in a terminal. It should be at least ‘1.9’ but we do recommend using Ruby 2.0+.
Install all required components with the following command (no need to download anything):
$ sudo gem install calabash-cucumber
Now you should have command calabash-ios and cucumber in your path.
The gem name is called calabash-cucumber and it gives commands for calabash-ios and cucumber.
Setup Your Local Environment
You can get started by creating a temp directory for calabash test:
$ mkdir new-calabash-test
$ cd new-calabash-test
$ calabash-ios gen
Now you should have features-directory inside new-calabash-test directory.
The Features directory contains my_first.feature-file, step_definitions-directory and support-directory. For a simple test you only need to edit my_first.feature-file.
Calabash includes a variety of predefined steps by default, so just in case if you are interested what’s included, here is the list: https://github.com/calabash/calabash-ios/blob/master/calabash-cucumber/features/step_definitions/calabash_steps.rb
Run Your First Test
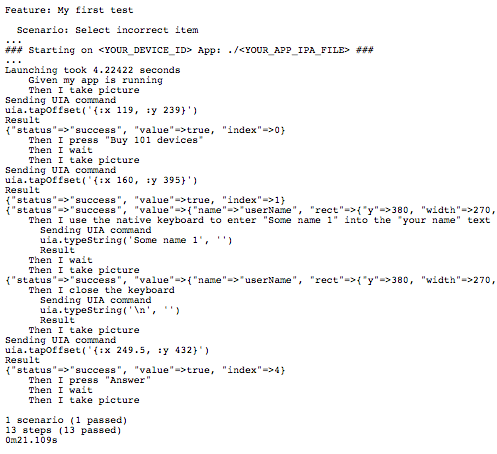
Here is a sample test:
Feature: My first test
Scenario: Select incorrect item
Given my app is running
Then I take picture
Then I press “Buy 101 devices“
Then I wait
Then I take picture
Then I use the native keyboard to enter “Some name 1” into the “your name” text field
Then I wait
Then I take picture
Then I close the keyboard
Then I take picture
Then I press “Answer“
Then I wait
Then I take picture
NOTE: If you are running your Calabash tests at Bitbar Testing (public version), you can skip the following step. If you want to run your Calabash test locally, please follow these steps: First of all, you need to know the devices IP address. Calabash will start the server to https://
$ mkdir screenshots
$ DEBUG=1 SCREENSHOT_PATH=./screenshots/ DEVICE=device DEVICE_ENDPOINT=https://
The output should look something like this:
Run Calabash iOS test on Bitbar Testing
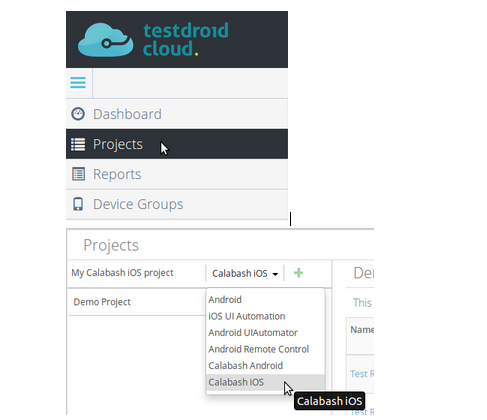
1. Once you are logged into Bitbar Testing, create a new Calabash iOS project (under Projects -> Plus-button -> Calabash iOS)

2. Create a new test run (by clicking the New Test Run button)
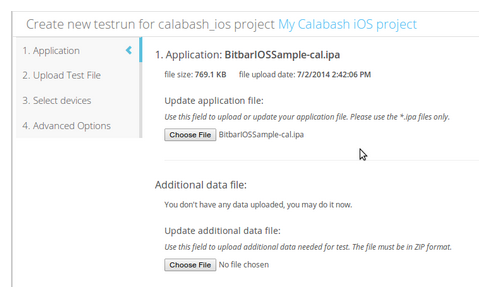
3. Upload your application. Remember that you have to add calabash.framework to your application.
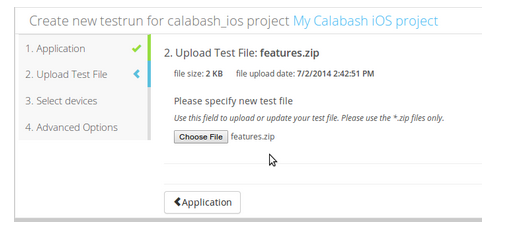
4. Upload your tests. Tests must be packed into a zip file and the zip file must contain features directory.
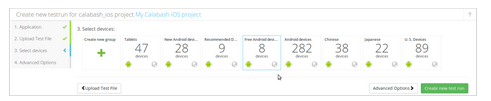
5. Select the device group and click Create a new test run.
Export .ipa from Your iOS Project
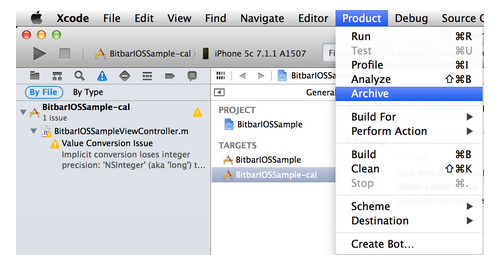
1. Select the target and click Archive from the Product menu
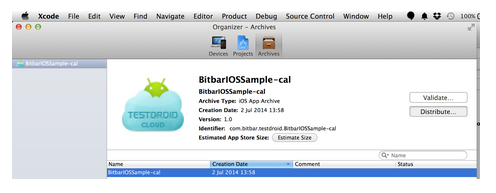
2. Click Distribute.
3. Select the second option “Save for Enterprise or Ad Hoc Deployment” and click Next.

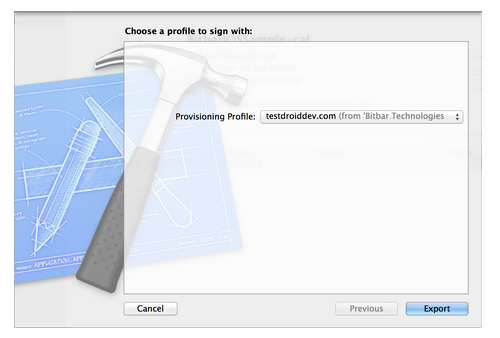
4. Select the Provisioning Profile you want to use and click Export.
How to Add Calabash.framework to Your App
You can download the framework with the following command:
$ calabash-ios download
This command will download the respective version for your calabash-ios gem.
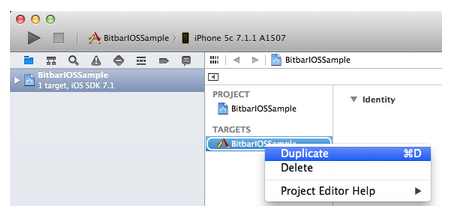
1. Duplicate target and rename it to YourApp-cal.
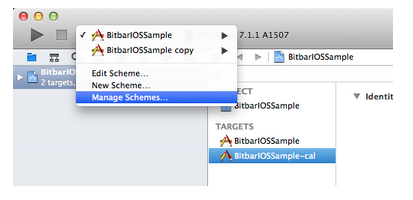
2. Click Manage Schemes.
3. Rename copied Scheme.

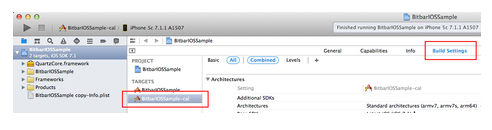
4. Select YourApp-cal target and open Build Settings.
5. Search for “product name”.

6. Rename Product Name.

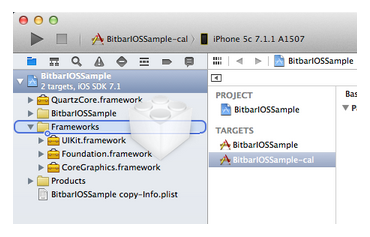
7. Drag and drop calabash.framework to your project left pane (Project Navigator) under Frameworks folder.
Happy Testing!