Appium Tip #14: 3 Tricks for Faster Appium Test Script Creation
This is our 14th blog in Things You Should Know About Appium blog series. We’ve covered lots of basic things, such as setting up an Appium environment, using various programming languages and frameworks (Java, Python, C#, Ruby, JavaScript, Mocha), plus tools and additional utilities that make your Appium use as smooth and easy as possible. Today, we’ll look at some of the best practices, tips and tricks of how to speed up the creation of Appium test scripts for your Android and/or iOS apps.
Download Our Free Appium Beginner’s Guide to Set Up a Proper Appium Testing Environment Today
Creating test scripts from scratch can be a very tedious process, especially when you have many different flows to create. If you have no access to the tested app’s source, you’ll have to figure out an efficient way to map the app’s UI. The methods that we know of and are about to explain here are all related to using the Appium inspector or uiautomatorviewer for native apps.
Create a Library for App Elements
One good way to handle multiple flows is to first create a library of all the elements you need to interact with. Simply navigate through the whole app with the Appium Inspector or uiautomatorviewer and mark down all the needed id, name and XPath values you’ll be using. This way you’re not limited to using the Appium Inspector or uiautomatorviewer at the time you’re actually writing your scripts. A correctly gathered library should be easy to check elements from and copy to your scripts as needed.
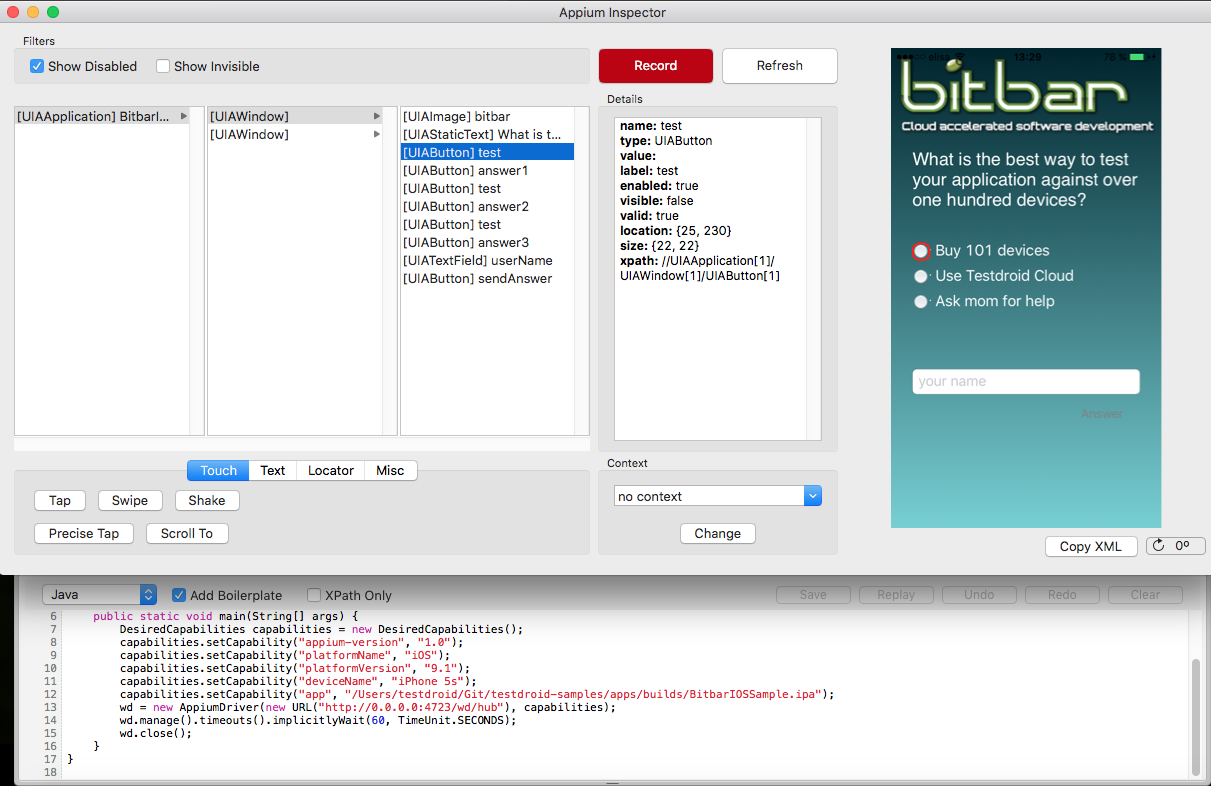
For example in our BitbarSampleApp, you’ll have several UI elements as radio check buttons, input boxes and a couple of buttons. When you click through any of these UI elements in your own app, you’ll get to see the details of that app and can pick those for your test script. On the picture above, XPath could be easily fetched and the test script could be formulated as follows:
WebElement appUI = driver.findElement(By.xpath("//UIAApplication[1]/UIAWindow[1]/UIAButton[1]"));
TouchActions simpleClick = new TouchActions(driver).tap(appUI);
simpleClick.perform();
Using gestures with Appium is relatively easy. For example this used TouchActions objects can contain several events: press, release, moveTo, tap, wait, longPress, cancel and perform.
Use Local Appium Server for Acceptance Test Creation
This should be a given, but worth noting in any case. Using a local Appium server with a local test device is always the fastest way to tweak and confirm your scripts. When you confirm that your test scripts work fine on a local setup, do check that you have desired capabilities configured properly for the test run on the cloud, and it’s also recommended to add some basic logic to find readily available device for your test.
In order to launch Appium server use the appium.js script that can be found in the bin directory to start the server up. For iOS you should add the -U, or --udid flag to the server, or with the udid desired capability. Note that if your application is already installed on devices where you’ll be testing your scripts out, you can also give it a bundle ID. For example:
desiredcapabilities.bundleId = 'com.bitbar.testdroid.BitbarIOSSample';
In order to get simultaneous test runs on several devices, you can start up multiple instances of Appium server that all use different ports. With multiple simultaneous devices in use at the same time, you need to set --port flag for the actual Appium port (default is 4723) and a --bootstrap-port for communication with the different Android devices. Furthermore, Selendroid and ChromeDriver also need their dedicated ports when automating multiple devices so don’t forget to set --selendroid-port and --chromedriver-port.
Xcode itself limits the use of multiple devices at the time (there is no limitation on the number of concurrent devices on Bitbar Testing) in a local environment. One single host machine can host only one iOS device per time.
Make Sure the Tested App has All That You Need
This isn’t an easy thing to affect on, but sometimes the apps you need to test might be lacking something on the UI side for you to make well-designed scripts.
It might be easy for developers to slack on giving unique ID’s and descriptions, attributes, and names to elements, but it can at the same time be a real pain for the Quality Assurance and testing folks. Depending on XPath values isn’t always the best way to go either, since the index numbers may change depending on how the app behaves in different situations – or – even when the app is further developed, new UI elements are introduced and those test scripts still rely on indexes given in the earlier phase of the Appium test script creation.
This is a common issue, but it can be nicely and soundly fixed by using Appium Inspector to go through those elements before you start hammering your tests on real devices in the cloud.
If you have a chance to affect on securing the naming of the UI, you should take it. One thing to note also is that on Android SDK the resource-id is something that exists only from API level 18 and upwards. If you need to test on devices on older Android version than that, you cannot depend on resource-id. You’ll have to do with the other UI element values on older OS.