Appium Tip #20: Executing Appium Tests with Gradle
This is the 20th blog in our Things You Should Know About Appium blog series and this time we’ll take a look on how to bridge the gap between Android Studio, Gradle and Appium tests running on a real device in the cloud. As you know, Appium client-side execution is slightly different compared to how other test automation frameworks are used and you typically just upload your APK (or IPA for iOS) first, then start your test from localhost and once the test is finalized you’ll (or your scripts) pull back the results for local inspection. Now, let’s look on how to get your Appium tests up and running — when built with Gradle.
One of the greatest things about Appium is that it works pretty much with any programming language and developers surely have plenty of options to pick from. We’ve talked about setting up the environment and running some basic tests with Python, Java, C#, Ruby, Mocha, and even testing React Native app with Appium. But there is very little information on how Android Studio and Gradle is used with Appium, what are the best practices and how to access real devices from your development tool. Before you go deep, download our free Appium beginner’s tutorial to building proper Appium infrastructure for Gradle tests.
A couple of years ago, we released a comprehensive Gradle plugin for bridging the gap between real devices on cloud and Android Studio development environment – and quite many of Android Studio users use this plugin nowadays. To learn how to push any APK from Android Studio to cloud and generally how to use Gradle plugin to get your builds tested on real devices – without a need to configure and maintain physical devices. However, this time we’ll look at how to configure your Gradle build files, how to prepare Appium test for device runs, and how to access those devices without manual effort.
The Basics of Appium and Selenium with Android Studio and Gradle
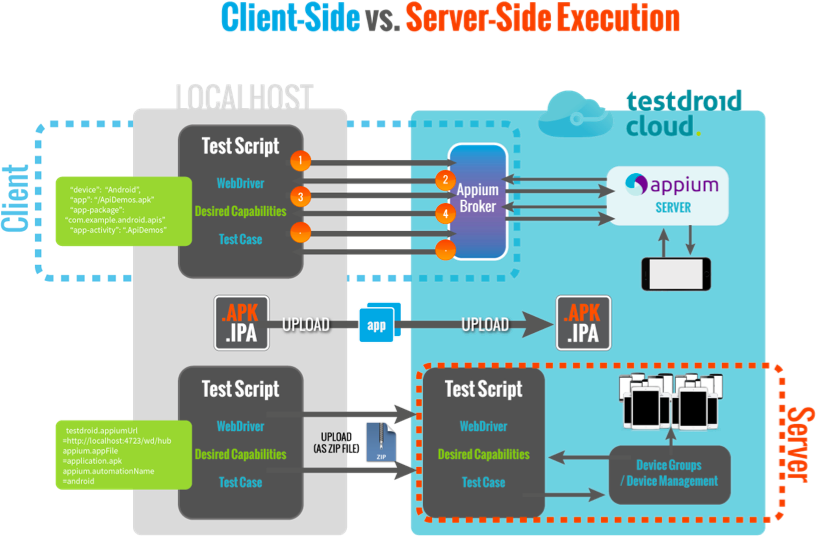
First, the nature of Appium (or Selenium if you will) client-side execution is very different from the regular Android instrumentation: with Android instrumentation you have two different APKs – one as your own application and one for the test itself (the instrumentation APK). The client-side Appium test script isn’t packaged as an APK but instead, it is executed as a test script – from your local machine. As this is fundamentally very different from the instrumentation concept, let’s highlight once again the difference between client-side and server-side Appium. The following picture illustrates the difference between these two:

I’ll be showing how to execute a basic client-side Appium test with Gradle, but remember that you can also include additional functionality to your tests by accessing the Bitbar REST API. Now, let’s drill in details how to set up your Gradle build files.
Setting up Appium
You naturally need the latest Android Studio installed and all required Appium components. First, you can download the Appium specific Java .jar files from The Central Repository. Android Studio is also able to fetch the dependencies with the built-in sync function as long as you have the repository included in the Project’s gradle.build file:
repositories {
    jcenter()
    mavenCentral()
}
Now, create a new Android Studio project or update your old one with an additional Java Library module. To add downloaded Appium .jar files in your project, you can simply place those files under your lib folder and then add them as file dependencies through the dependency plus button from the module settings. Alternatively, you can add dependencies as Library dependency by searching with keywords or fully-qualified Maven Central coordinates.
Then, make sure you have all dependencies properly set up in the test module’s gradle.build file. My example uses the dependencies from our java test sample and should contain the following items:
apply plugin: 'java'
dependencies {
    compile fileTree(dir: 'lib', include: ['*.jar'])
    compile 'junit:junit:4.12'
    compile 'io.appium:java-client:3.3.0'
    compile 'com.googlecode.json-simple:json-simple:1.1.1'
    compile 'org.apache.httpcomponents:httpclient:4.5.1'
    compile 'commons-lang:commons-lang:2.6'
    compile 'com.google.code.gson:gson:2.5'
    compile 'com.google.http-client:google-http-client:1.21.0'
    compile 'com.testdroid:testdroid-api:2.9'
    compile 'com.google.http-client:google-http-client-jackson2:1.21.0'
}
Note that this list now includes all the dependencies in Maven Central dependency form for the test script module (not to be necessarily mixed with the gradle.build file for the Android app module or for the Project itself). The first compile statement also would collect any .jar files included in the lib directory.
Appium with Gradle Example with Bitbar Sample App
Let’s use our Bitbar Sample App as an example here to provide you with a real-world case. You can find both – the source code package and APK – at Github.
Then, let’s look at some code examples. First, you need to add some variables for uploading the APK and path to the APK:
    private static final String TARGET_APP_PATH = "path/to/this/file/BitbarSampleApp.apk";
    private static final String TESTDROID_SERVER = "https://appium.testdroid.com";
    private static int counter;
    ...
    Map env = System.getenv();
    String testdroid_apikey = env.get("TESTDROID_APIKEY");
If you don’t have TESTDROID_APIKEY as an environmental variable, you set it up directly like this:
String testdroid_apikey = "123456789abcdefghijklmnopqrstuvx";
The Bitbar APIKEY can be pulled from Bitbar Testing -> your profile on top the right corner -> My account and API key. Simply copy that and paste into your TESTDROID_APIKEY variable:

Check that APIKEY is properly set before uploading your APK:
        if(StringUtils.isEmpty(testdroid_apikey)) {
            throw new IllegalArgumentException("Missing TESTDROID_APIKEY environment variable");
        }
        String fileUUID = uploadFile(TARGET_APP_PATH, TESTDROID_SERVER, testdroid_apikey);
And then configure those desired capabilities (Note that you don’t have to configure the testdroid_ desired capabilities if you are using ‘server-side Appium’ for your test runs. If the capabilities work against your local Appium server, they will work in server-side tests too.):
        DesiredCapabilities capabilities = new DesiredCapabilities();
        capabilities.setCapability("platformName", "Android");
        capabilities.setCapability("testdroid_target", "Android");
        capabilities.setCapability("deviceName", "Android Device");
        capabilities.setCapability("testdroid_apiKey", testdroid_apikey);
        capabilities.setCapability("testdroid_project", "LocalAppium");
        capabilities.setCapability("testdroid_testrun", "Android Run 1");
        // See available devices at: https://cloud.testdroid.com/#public/devices
        capabilities.setCapability("testdroid_device", "Samsung Galaxy Nexus SPH-L700 4.3");
        capabilities.setCapability("testdroid_app", fileUUID);
So in these desired capabilities, we’re basically setting platform as ‘Android’ (platformName, testdroid_target and deviceName), use the previously fetched API Key, configure the test run/project settings properly and picking up the device (Samsung Galaxy Nexus SPH-L700 4.3) which is a freemium device on Bitbar Testing.
In addition, you can set some additional desired capabilities if you want to further configure/set up your project settings:
        // Optional
        //capabilities.setCapability("testdroid_description", "Appium project description");
        //capabilities.setCapability("platformVersion", "4.4.2");
        //capabilities.setCapability("app-activity", ".BitbarSampleApplicationActivity");
        //capabilities.setCapability("app", "com.bitbar.testdroid");
        System.out.println("Capabilities:" + capabilities.toString());
And to create an Appium session and push this test to Bitbar Testing:
        System.out.println("Creating Appium session, this may take couple minutes..");
        wd = new AndroidDriver(new URL(TESTDROID_SERVER+"/wd/hub"), capabilities);
Ok. That’s the basic setup for Appium test with Gradle build and getting things executed against the devices on Bitbar Testing. As it comes to the test itself, let’s use something basic as follows:
 public void mainPageTest() throws IOException, InterruptedException {
     wd.manage().timeouts().implicitlyWait(60, TimeUnit.SECONDS);
     takeScreenshot("start");
     wd.findElement(By.xpath("//android.widget.RadioButton[@text='Use Testdroid Cloud']")).click();
     wd.findElement(By.xpath("//android.widget
               .EditText[@resource-id='com.bitbar.testdroid:id/editText1']")).sendKeys("John Doe");
     takeScreenshot("after_adding_name");
     wd.navigate().back();
     wd.findElement(By.xpath("//android.widget.ScrollView[1]/android.widget.LinearLayout[1]
                       /android.widget.LinearLayout[2]/android.widget.Button[1]")).click();
     takeScreenshot("after_answer");
 }
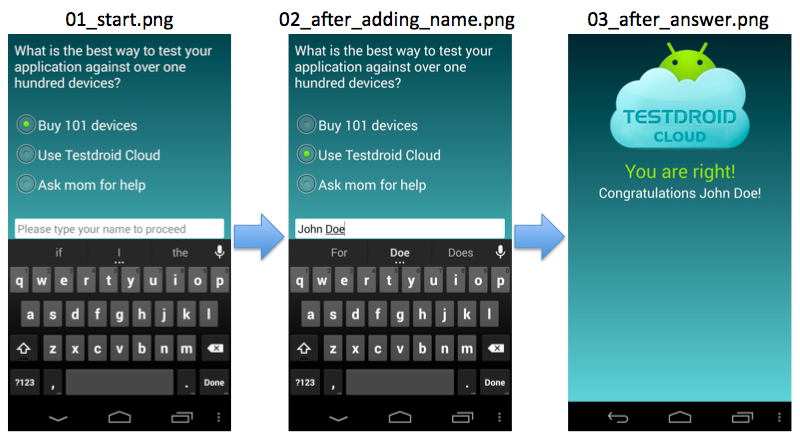
Now, you should see the following pictures fetched back to your local environment:

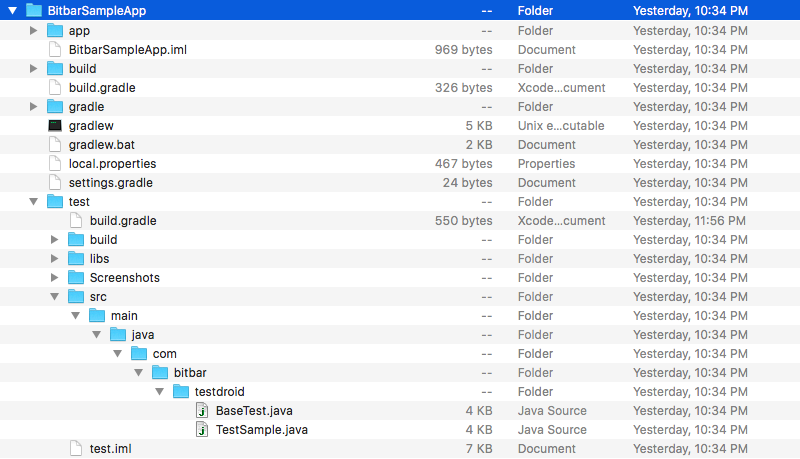
The folder structure looks somewhat like this when the test module is created alongside the BitbarSampleApp’s app module:

Building and working with Gradle for Appium tests isn’t that difficult, but there are some benefits to consider when choosing between client-side and server-side execution. The Bitbar Gradle Plugin will soon get an update so stay tuned and keep on testing!
See you again next week!