Testing asynchronous APIs (AsyncAPIs) is becoming increasingly important as more and more APIs adopt asynchronous communication patterns. ReadyAPI now supports testing of AsyncAPIs, making it an even better tool for API testing. In this blog post, we’ll provide step by step guidelines on how to import your AsyncAPIs from SwaggerHub into ReadyAPI and how to test them. Hopefully, this will help you get started with testing your own asynchronous APIs.
What are asynchronous APIs?
Before we dive into how to do it, let’s define what asynchronous APIs are. Asynchronous APIs are a type of programming interface where the program can execute multiple tasks simultaneously without waiting for each task to be completed before moving on to the next one. This means that a program can initiate a request to an asynchronous API and continue executing other code without waiting for a response from the API.
With asynchronous APIs, the program can register a callback function that will be executed once the API response is received. This allows the program to continue executing other code while waiting for the API response to come back. Asynchronous APIs are particularly useful for applications that need to perform long-running tasks, such as network requests or file I/O, without blocking the main thread of execution.
Now that we know what they are, we can move onto the next step; testing!
What do you need?
Before we start, make sure you have the following:
- A SwaggerHub account.
- A ReadyAPI license.
- An AsyncAPI specification in SwaggerHub.
Importing your AsyncAPI from SwaggerHub
- Log in to your SwaggerHub account and navigate to the AsyncAPI specification you want to import into ReadyAPI.
- Click on the Download button and select YAML as the format.
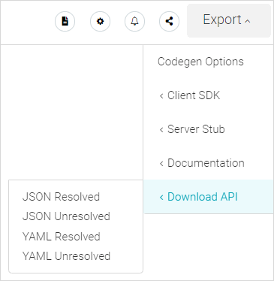
- Save the YAML file to your local machine.
- Open ReadyAPI and click on File > Import.
- In the Import File dialog box, select AsyncAPI as the format and browse for the YAML file you saved in step 3.
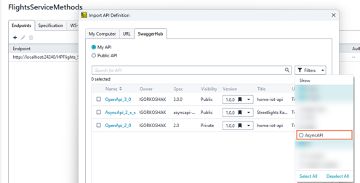
- Click on Import and your AsyncAPI specification will be imported into ReadyAPI.
Testing your AsyncAPI in ReadyAPI
- Once API imported, go To API Navigator and select the Publisher or Subscriber channel.
- Right click and Add to Test Case
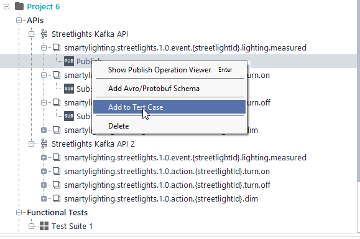
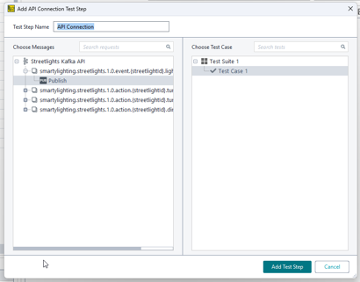
- The API Connection test step can be used for working with asynchronous APIs, in particular Kafka. In their case, publishers send messages (or events) to a channel on a broker, and subscribers get those messages (events) by subscribing to the channel.
- In ReadyAPI, the API Connection test step can operate in two modes:
- In Publish mode, it acts as an event publisher (or producer): it connects to a broker, sends an event, and then disconnects.

- In Subscribe mode, it acts as an event subscriber (or consumer): it connects to a broker and continues consuming events as long as the connection is open.

- In other words, to send requests and get responses in ReadyAPI, you must take two test steps: the first one sends requests as a publisher, the second one gets responses as a subscriber. To validate those messages, you use assertions.
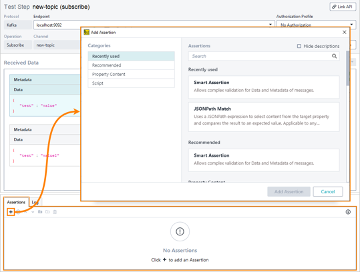
- To create complex verification conditions, you can organize assertions into assertion groups.
- You can also filter the messages to show only those that either passed or failed a certain assertion. To do that, point to an assertion and select the needed option from the drop-down list.
If you’re ready to take your AysncAPIs to the next level, try ReadyAPI now for free. Happy testing!