Appium Tip #7: Mastering Appium Through the Command Line
Today, we’ll be focusing on using the command line for your Appium tests and testing. This blog is part of our Things You Should Know About Appium blog series that will provide you the best practices, a variety of tips and tricks, plus more insights on how Appium can be used efficiently for your mobile app, game, or web testing. In addition, Appium server-side runs can be launched from the command line – check this out and you’ll learn how!
Appium is a fast-growing platform with an active open source community. This means that its code gets updated and further developed on a regular basis, especially because of the fast-moving mobile OS world that we live in. It is not unusual to see developers sweat over the news that a new mobile OS version is coming up soon. The amount of time to make sure that your apps work on the upcoming version tends to be short, which also puts a lot of stress for the people handling Quality Assurance. If developers have a short time to prepare, the QA probably has even less time to do so.
To get the latest version of Appium, you should pull the source code from Github and then compile it on your designated host machine. Appium is provided with a script to handle the build process, although it does require some prepping when doing so for the first time. Once all pre-requisites are found on your system, the building shouldn’t be a problem from thereon.
If you need any help getting the environment, any Appium stuff properly setup, please take a look at these instructions.
Prerequisites for Appium
First, depending on what you intend to automate it’s probably easiest to see if your machine already has all the requirements installed. You can try this by navigating to Appium directory and running the appium-doctor.js script found at the bin directory. If you don’t intend to automate both iOS and Android devices, you can safely ignore any warnings of the platform you don’t need. Using JavaScript? Take a look at these guidelines for getting everything running smoothly.
When we want to build Appium on a Mac device to support all the usual automation needs for both iOS and Android devices, we use this command:
$ ./reset.sh --android --selendroid --ios --real-safari --verbose
The --verbose flag is very important if you suspect that you might be missing any dependencies as it shows detailed information on the build process.
Furthermore, do check that everything is properly configured, whether you are using Java, Ruby, Python or C#.
Prepping the Test Devices
Once you have Appium server built up and ready to go, the next step is to connect your test device(s) to the machine and accept any trust dialogs the devices may show. On Android devices, you need to enable USB debugging in the Developer options and also allow the device to install APK files from “unknown sources”.

iOS devices require UI Automation to be enabled in the Developer settings, which should be visible as long as you can see the device in Xcode Devices window (cmd+shift+2 on Mac). To make sure your device is activated for test automation, you should also open up Instruments from the Xcode and select the devices you have as active devices.
Using Appium from the Command Line
To launch Appium, use the appium.js script found in the bin directory to fire up the server. For iOS, you will need to add the -U, or --udid, flag with the udid of your target device.
If you want to automate multiple devices at the same time, simply fire up multiple instances of the Appium server, all with different ports in use. With multiple devices, you need to set --port flag for the actual Appium port (default 4723) and a --bootstrap-port for communication with the different Android devices. Selendroid and ChromeDriver also need their dedicated ports when automating multiple devices so don’t forget to set --selendroid-port and --chromedriver-port as well, if you need Selendroid or Chrome.
You should note that no more than one iOS device can be automated in a single host machine due to restrictions in Xcode.
Launching Tests Towards Your Server
Okay, so hopefully you have now an Appium server happily running. You’re ready to launch your tests towards it then! All you need to do is let your test scripts know which address to connect to.
If the server runs in your localhost, and in default port, you can set the Webdriver to initialize towards https://localhost:4723/wd/hub. If you have multiple servers running, simply make sure the IP address and port number are matching to the server you want to use. That’s it!
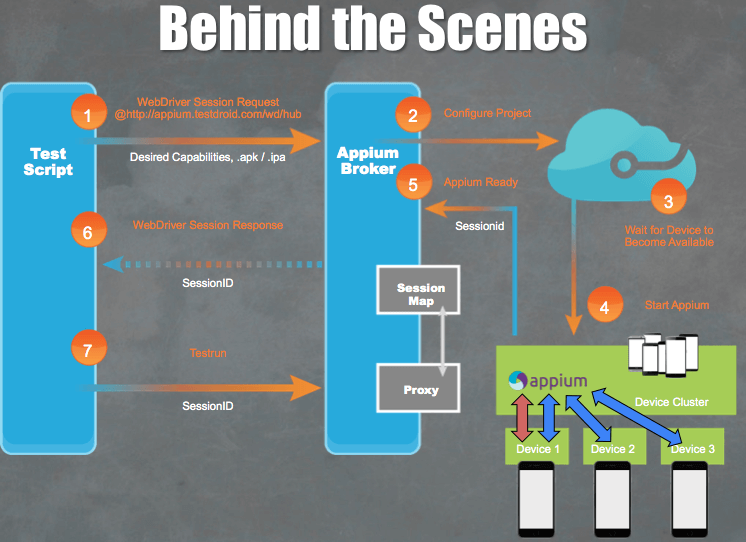
On our mobile app testing platform, we have developed our very own Appium Broker, which handles the communications of all on-going sessions between clients and Appium servers. In other words, we handle the creation of all the Appium server instances with their dedicated ports completely on the cloud side so that all you need to do is launch your tests towards https://appium.testdroid.com/wd/hub.
Happy Appium Testing!