The first use of an XML DataSource that might come to mind is reading XML files from the file system. While that might be useful at times, I think that response processing is where the XML DataSource really shines.
"But the messages that I'm testing are not in XML," I hear some of you say. The great thing - and another reason why I call this TestStep a hidden gem - is it doesn't matter! soapUI automatically maintains an XML copy of all messages; be they JSON, AMF or anything else.
Example scenario
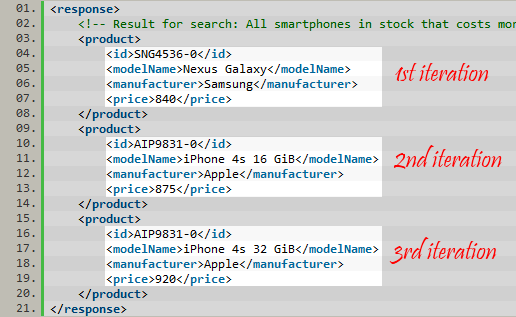
Suppose that we have a soapUI TestStep called Search Items, which sends a search request to the service being tested. At one point, a search for all items priced more than $800 gives the following response:
This is a very common scenario. From here on, depending on the requirements, there are a number of different things that we might want to do. For example:
- Verify that all products in the response are priced more than $800.
- Verify that every product ID exists in some database.
- Verify that there are two iPhones in the response.
- Log the model names in a comma separated text file.
- Check which products are more expensive than a competitor.
- Calculate the average price of all Samsung products.
All these things involve iterating through all the product elements of the response. This is a very common task in soapUI - you send one request, but expect a variable number of response fragments back that you need to verify. Now, how do we approach such problems in soapUI?
XML DataSource to the rescue
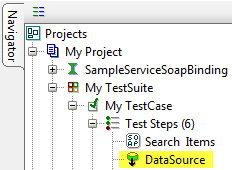
Let's create a DataSource TestStep subsequent to our Search Items request TestStep:
We set the type of the DataSource to XML and start configuring it by asking ourselves three questions:
- Where is the source XML?
- Which XML elements to iterate?
- What data to save from iterations?
Where is the source XML?
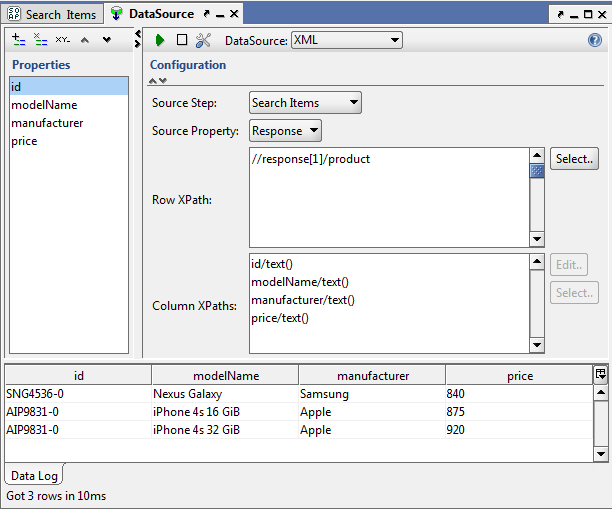
Setting Source Step to Search Items and Source Property to Response will set the DataSource to iterate through the response from our Search Items TestStep.
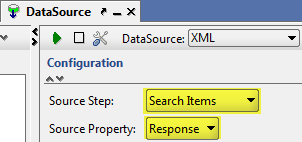
Note that if Search Items would have been a JSON/REST or something else that isn't XML, we would simply use ResponseAsXml instead of Response.
Which XML elements to iterate?
Now that the DataSource knows which XML source we want it to use, it needs to know which elements in that property that it should iterate (an XML element is the formal name for a tag, e.g. Some content
Luckily, soapUI can generate XPath expressions for us. Just click the Select… button:
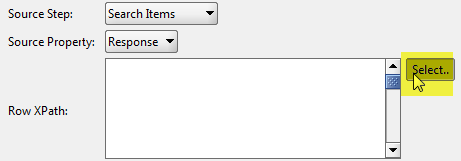
Since our plan is to iterate through each product element and collect various data, we select one of the product nodes in the tree view:
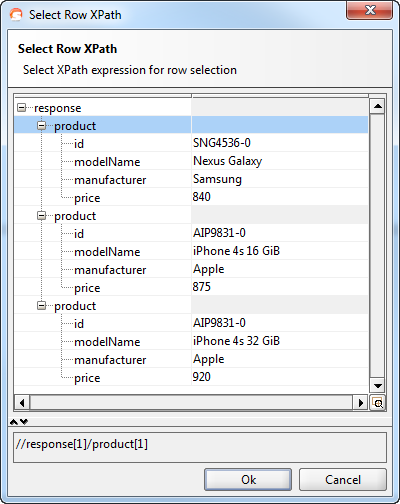
When we click Ok, we see that soapUI has generated the XPath expression //response[1]/product[1]. This will match the first product element in the first response element, which is almost what we want. What we really want is to match any product element of the first response element, so we manually remove the last part of the expression, resulting in:
//response[1]/product.
This will set our DataSource to iterate the XML like this:
What data to save from iterations?
Our XML DataSource now knows that it should iterate through all product elements in the response from Search Items. The only thing left is to tell it what data to gather from each iteration.
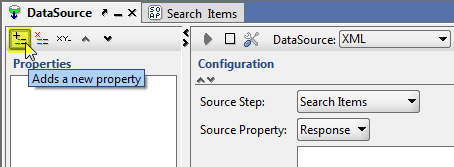
As you might already know, a common way to save data from TestSteps is to put them in the TestStep’s properties; so let’s start by creating a Property for our DataSource:
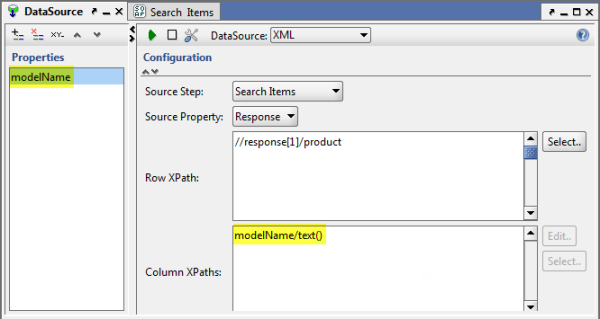
When creating a Property, a corresponding XPath expression will be created in the Column XPaths list. The result of this XPath expression is what will be stored in the Property.
As per default, the generated XPath expression will be myProperty/text(). This expression translates to "fetch all the text contained in the myProperty element". Applied to our example scenario, modelName/text() would return "Nexus Galaxy" in the first iteration.

So let's go ahead and create a Property called modelName in our DataSource:
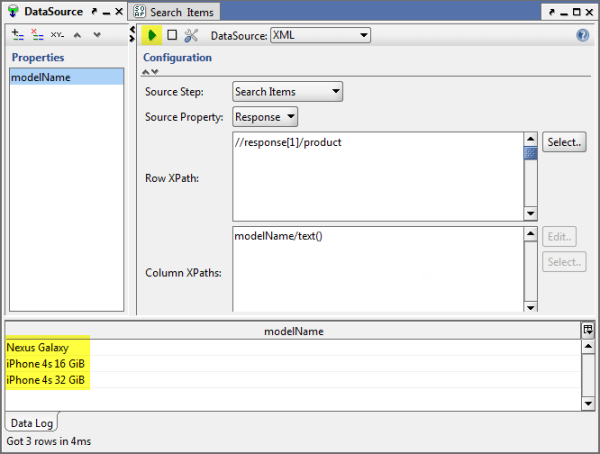
We are now ready to test our DataSource by clicking the play button:
We can add how many Properties we want:
How to make use of the saved data
Now that we have configured our XML DataSource, we can use it in our TestCase in the same way that we would use any other DataSource. From here on, it’s easy to process any of the product properties. Just reference them in any subsequent TestStep, using this syntax:
${DataSource#modelName}
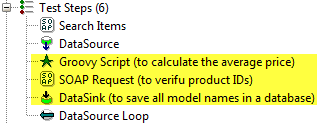
Here are just a few example TestSteps that we could use to solve the common problems that I mentioned in the beginning of this article:
I hope that this article will make you see through the somewhat abstract and complicated façade of XML DataSources, and realize how useful it is. Until next time… happy testing!